Ever wondered how to hand embroider a hat? Well, you’re not alone! Embroidering hats has become one of the hottest DIY trends, and for good reason. It’s a creative way to personalize your accessories and add a unique touch to your wardrobe. Whether you’re a beginner or just looking to level up your skills, this guide will walk you through every step of the process. From choosing the right tools to finishing your masterpiece, we’ve got you covered!
Hand embroidery is not just about stitching—it’s about storytelling. Every stitch you make tells a story, and when you embroider a hat, you’re creating something truly special. Think of it as adding your own flair to a blank canvas. And let’s be honest, who doesn’t love a hat that screams “I made this!”?
In this article, we’ll dive deep into the world of hand embroidery on hats. You’ll learn everything from the basics of embroidery to advanced techniques that will take your creations to the next level. So grab your needles, threads, and a cup of coffee, because we’re about to get crafty!
Read also:Courtney Taylor Porn Actress The Story Behind The Spotlight
Table of Contents
- Essential Tools You’ll Need
- Choosing the Right Materials
- Preparing Your Hat for Embroidery
- Basic Stitches to Master
- Creating Your Design
- Transferring Your Design Onto the Hat
- Stabilizing Your Hat for Stitching
- The Art of Embroidering Your Hat
- Finishing Touches
- Pro Tips for Perfect Hat Embroidery
Essential Tools You’ll Need
Before you start embroidering your hat, it’s important to gather all the necessary tools. Having the right tools makes the process smoother and more enjoyable. Here’s a list of essentials you’ll need:
- Embroidery needles (different sizes for different threads)
- Embroidery floss (various colors to match your design)
- Embroidery hoop (small enough to fit on a hat)
- Scissors (sharp and precise for cutting threads)
- Transfer pens or pencils (for sketching your design)
- A stabilizer (to keep your hat in place while stitching)
- Thimble (optional, but helpful for protecting your fingers)
Don’t worry if you don’t have all these tools right away. You can start with the basics and upgrade as you go. The key is to ensure your tools are of good quality to make your embroidery experience as pleasant as possible.
Why Quality Tools Matter
Investing in quality tools is crucial for achieving professional-looking results. Cheap needles can bend or break, and low-quality threads may tangle or fray easily. By using high-quality materials, you’ll not only make your life easier but also ensure your embroidery lasts longer.
Choosing the Right Materials
Now that you’ve got your tools ready, let’s talk about materials. The type of hat you choose can greatly affect your embroidery process. Here are some tips for selecting the perfect hat:
- Material: Opt for hats made from cotton or canvas. These materials are easier to work with and provide a sturdy surface for stitching.
- Color: Consider the color of your hat when choosing thread colors. A light-colored hat allows for more vibrant designs, while a dark hat can create a more subtle, elegant look.
- Shape: Flat-brimmed hats are easier to embroider than curved ones. If you’re a beginner, start with a simpler hat shape to build your confidence.
Remember, the material of your hat should complement your design. A well-chosen hat can enhance the overall impact of your embroidery.
Preparing Your Hat for Embroidery
Preparation is key to successful embroidery. Here’s how you can get your hat ready:
Read also:Ap9 And Coco Austin The Untold Story Behind The Scenes
First, give your hat a good clean. This ensures that there’s no dirt or grease that could interfere with your stitching. You can hand wash it or use a damp cloth to wipe it down.
Next, decide where you want to place your design. Mark the spot lightly with a transfer pen or pencil. This will serve as a guide when you start stitching.
Finally, make sure your hat is secure. Use an embroidery hoop to hold the fabric taut. This prevents wrinkles and ensures even stitching.
Common Mistakes to Avoid
One common mistake beginners make is not securing the hat properly. A loose hat can lead to uneven stitches and frustration. Always double-check that your hat is firmly in place before you start stitching.
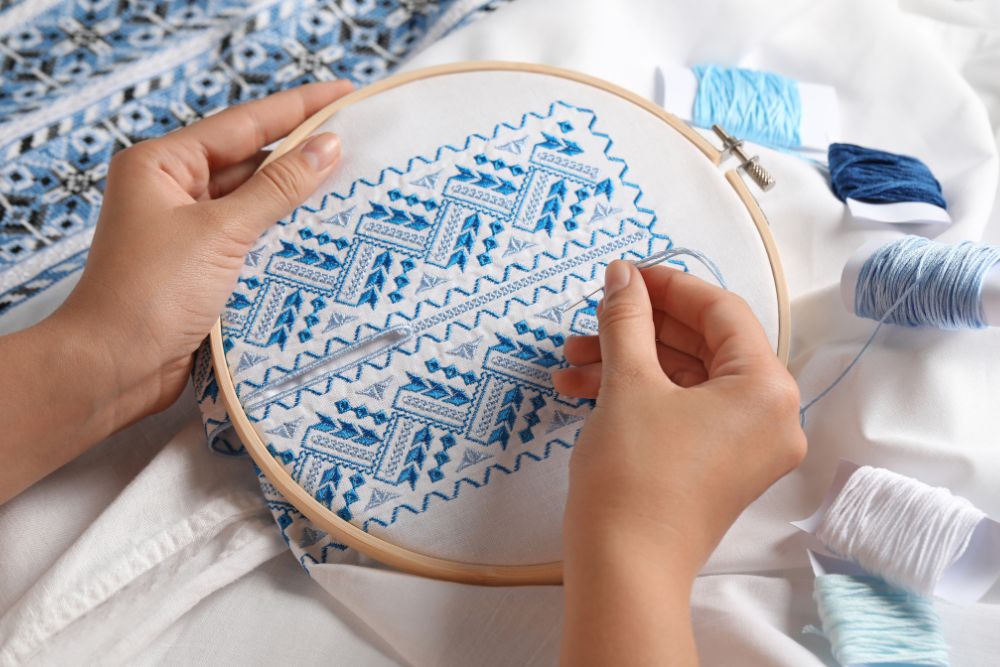
Basic Stitches to Master
Now that your hat is ready, it’s time to learn some basic stitches. These stitches form the foundation of hand embroidery and will help you create beautiful designs:
- Straight Stitch: The simplest stitch, perfect for creating lines and outlines.
- Satin Stitch: Ideal for filling in small areas with smooth, solid color.
- Backstitch: Great for creating detailed lines and outlines.
- French Knot: Adds texture and dimension to your design.
- Chain Stitch: Creates a decorative line or border.
Practice these stitches on a scrap piece of fabric before moving on to your hat. This will help you gain confidence and improve your technique.
Experimenting with Stitches
Once you’ve mastered the basics, don’t be afraid to experiment. Try combining different stitches to create unique textures and patterns. The more you practice, the more versatile your embroidery skills will become.
Creating Your Design
Your design is the heart of your embroidery project. Here’s how you can create a stunning design for your hat:
Start by sketching your design on paper. Keep it simple if you’re a beginner, or go all out if you’re feeling adventurous. Consider the size and placement of your design on the hat.
Once you’re happy with your sketch, refine it by adding details and choosing colors. This is where your creativity can truly shine. Let your personality and style guide your design choices.
Remember, your design doesn’t have to be perfect. Imperfections can add character and charm to your embroidery.
Getting Inspired
If you’re stuck for ideas, look for inspiration online or in nature. Pinterest and Instagram are great resources for embroidery designs. You can also draw inspiration from your favorite patterns, shapes, or symbols.
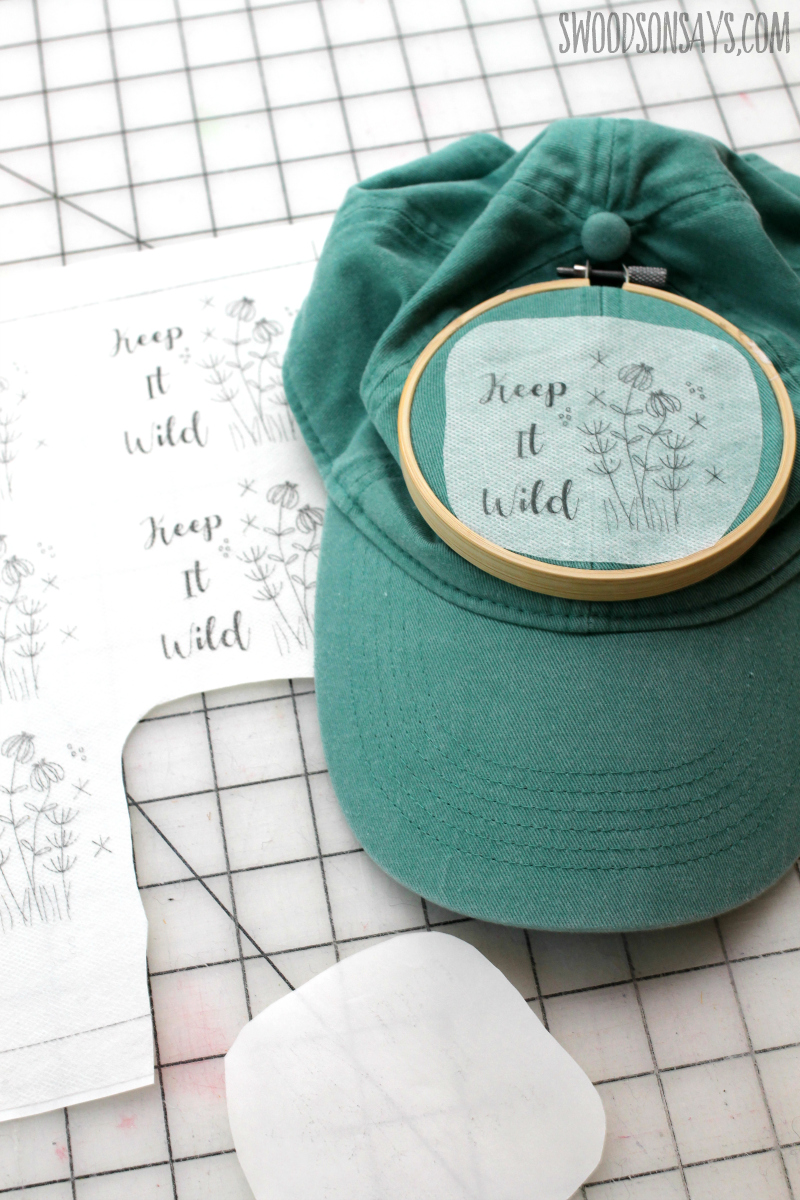
Transferring Your Design Onto the Hat
Transferring your design onto the hat is a crucial step. Here’s how you can do it:
Use a transfer pen or pencil to lightly trace your design onto the hat. Make sure the lines are visible but not too dark, as they may show through your stitches.
Alternatively, you can use a lightbox or window to trace your design. Place your hat on the lightbox, position your sketch over it, and trace the lines carefully.
Once your design is transferred, double-check that it’s aligned and centered. This will ensure a professional-looking finish.
Using Technology
If you’re tech-savvy, consider using a projector to transfer your design. This method is especially useful for complex designs. Simply project your sketch onto the hat and trace the lines with a transfer pen.
Stabilizing Your Hat for Stitching
Stabilizing your hat is essential for achieving neat and even stitches. Here’s how you can stabilize your hat:
Use an embroidery hoop to hold the fabric taut. Place the hoop over your design and tighten it securely. This will prevent the fabric from shifting while you stitch.
For curved hats, you may need to use a stabilizer. A stabilizer is a piece of material that provides extra support and prevents distortion. You can find stabilizers at most craft stores.
Remember to check your stabilizer frequently to ensure it’s still providing adequate support. Adjust as needed to maintain even tension.
Tips for Stabilization
One tip for stabilizing curved hats is to use a water-soluble stabilizer. This type of stabilizer dissolves easily after you’re done stitching, leaving no residue behind.
The Art of Embroidering Your Hat
Now comes the fun part—embroidering your hat! Here’s how you can bring your design to life:
Start by threading your needle with the color of your choice. Tie a knot at the end of the thread to secure it. Begin stitching from the back of the hat, working your way outward.
Follow your design closely, using the stitches you’ve learned. Take your time and focus on each stitch. This will ensure a neat and professional finish.
As you progress, periodically check your work. Make adjustments if needed and don’t be afraid to undo stitches if they’re not quite right. Practice makes perfect!
Staying Focused
Embroidering a hat can be time-consuming, so it’s important to stay focused and motivated. Set small goals for yourself, such as completing one section of the design at a time. Reward yourself after each milestone to keep the momentum going.
Finishing Touches
Once your embroidery is complete, it’s time to add the finishing touches:
Trim any excess threads carefully, ensuring you don’t cut the stitches themselves. Use a small pair of scissors for precision.
Give your hat a final inspection. Look for any loose threads or imperfections and fix them as needed. This will ensure your embroidery looks polished and professional.
Finally, give your hat a gentle press with an iron (if safe for the material) to smooth out any wrinkles. Your masterpiece is now ready to wear and show off!
Displaying Your Work
Consider framing your embroidered hat or taking photos to share with friends and family. You can even sell your creations online if you’re feeling entrepreneurial. The possibilities are endless!
Pro Tips for Perfect Hat Embroidery
Here are some pro tips to help you achieve perfect hat embroidery:
- Use a thimble to protect your fingers while stitching.
- Keep your threads organized to avoid tangling.
- Practice on scrap fabric before working on your hat.
- Experiment with different thread thicknesses for added texture.
- Join online embroidery communities for support and inspiration.
Remember, embroidery is a journey, not a destination. Enjoy the process and don’t be afraid to make mistakes. They’re all part of the learning experience!
Final Thoughts
Hand embroidering a hat is a rewarding and creative activity that allows you to express yourself. By following this guide, you’ll be well on your way to creating stunning embroidered hats that reflect your unique style.
So, what are you waiting for? Grab your tools, choose your materials, and start stitching. Don’t forget to share your creations with us in the comments below or on social media. We’d love to see what you come up with!
Happy stitching, and remember—every stitch tells a story!