So, you wanna learn how to draw cartoon lips? Buckle up, my friend, because we’re about to dive deep into the world of sketching some seriously cute and quirky lips. Whether you're a total beginner or just looking to improve your skills, this guide’s got you covered. Cartoon lips might seem simple, but trust me, there’s an art to making them look fun, expressive, and totally on point. Let’s get started!
Drawing cartoon lips isn’t just about creating a pair of lips; it’s about capturing personality, emotion, and that little extra flair that makes your art stand out. Think about it—every character has its own unique style, and their lips play a big role in defining who they are. From big, bold pouts to tiny, playful smirks, the possibilities are endless. And that’s what makes it so much fun!
Now, before we jump into the nitty-gritty details, let’s set the mood. Grab your pencil, eraser, and a blank sheet of paper. Or if you’re more of a digital artist, fire up your tablet and favorite drawing app. Ready? Let’s go!
Read also:Angel Brinks First Husband Unveiling The Untold Story
Why Learning How to Draw Cartoon Lips Is Important
Alright, let’s talk about why mastering cartoon lips is such a big deal. Whether you're drawing characters for fun or working on a professional project, lips are one of those features that can make or break your artwork. They’re not just a small detail—they’re a key part of expressing emotion and giving your characters life. Think about it—how many times have you seen a character’s personality shine through their smile, smirk, or even a frown?
Cartoon lips are especially important because they’re exaggerated and expressive. Unlike realistic lips, cartoon lips allow you to play with shapes, sizes, and proportions. This means you can get super creative and have a blast experimenting with different styles. Plus, once you master the basics, you’ll be able to add that extra touch of personality to all your characters.
Here’s the thing: learning how to draw cartoon lips isn’t just about improving your technical skills. It’s also about understanding how to convey emotion and bring your characters to life. And honestly, that’s what makes art so rewarding. So, let’s break it down and see how you can start creating those amazing cartoon lips today!
Basic Anatomy of Cartoon Lips
Before we dive into the drawing process, it’s important to understand the basic anatomy of cartoon lips. Don’t worry, this isn’t gonna be some boring biology lesson. We’re talking about cartoon anatomy here, which is all about simplifying and exaggerating real-life features to create something fun and dynamic.
In the world of cartoons, lips are often reduced to simple shapes like ovals, circles, or even straight lines. The upper lip is usually thinner than the lower lip, and the corners of the mouth can be curved or angular depending on the character’s personality. Some cartoon lips are big and bold, while others are small and subtle. The key is to experiment and find what works best for your character.
Here’s a quick rundown of the basic shapes you’ll encounter when drawing cartoon lips:
Read also:Jacob Joseph Worton Movies A Deep Dive Into His Cinematic Journey
- Oval-shaped lips for a cute and playful look
- Circular lips for a more exaggerated and cartoony style
- Thin, straight lines for a minimalist or serious character
- Curved lines for a friendly and approachable vibe
Pro Tip: Start with Simple Shapes
When you’re first learning how to draw cartoon lips, it’s always a good idea to start with simple shapes. This will help you understand the basic structure and proportions before moving on to more complex designs. Plus, it’s a lot less intimidating than trying to draw a perfect lip right off the bat!
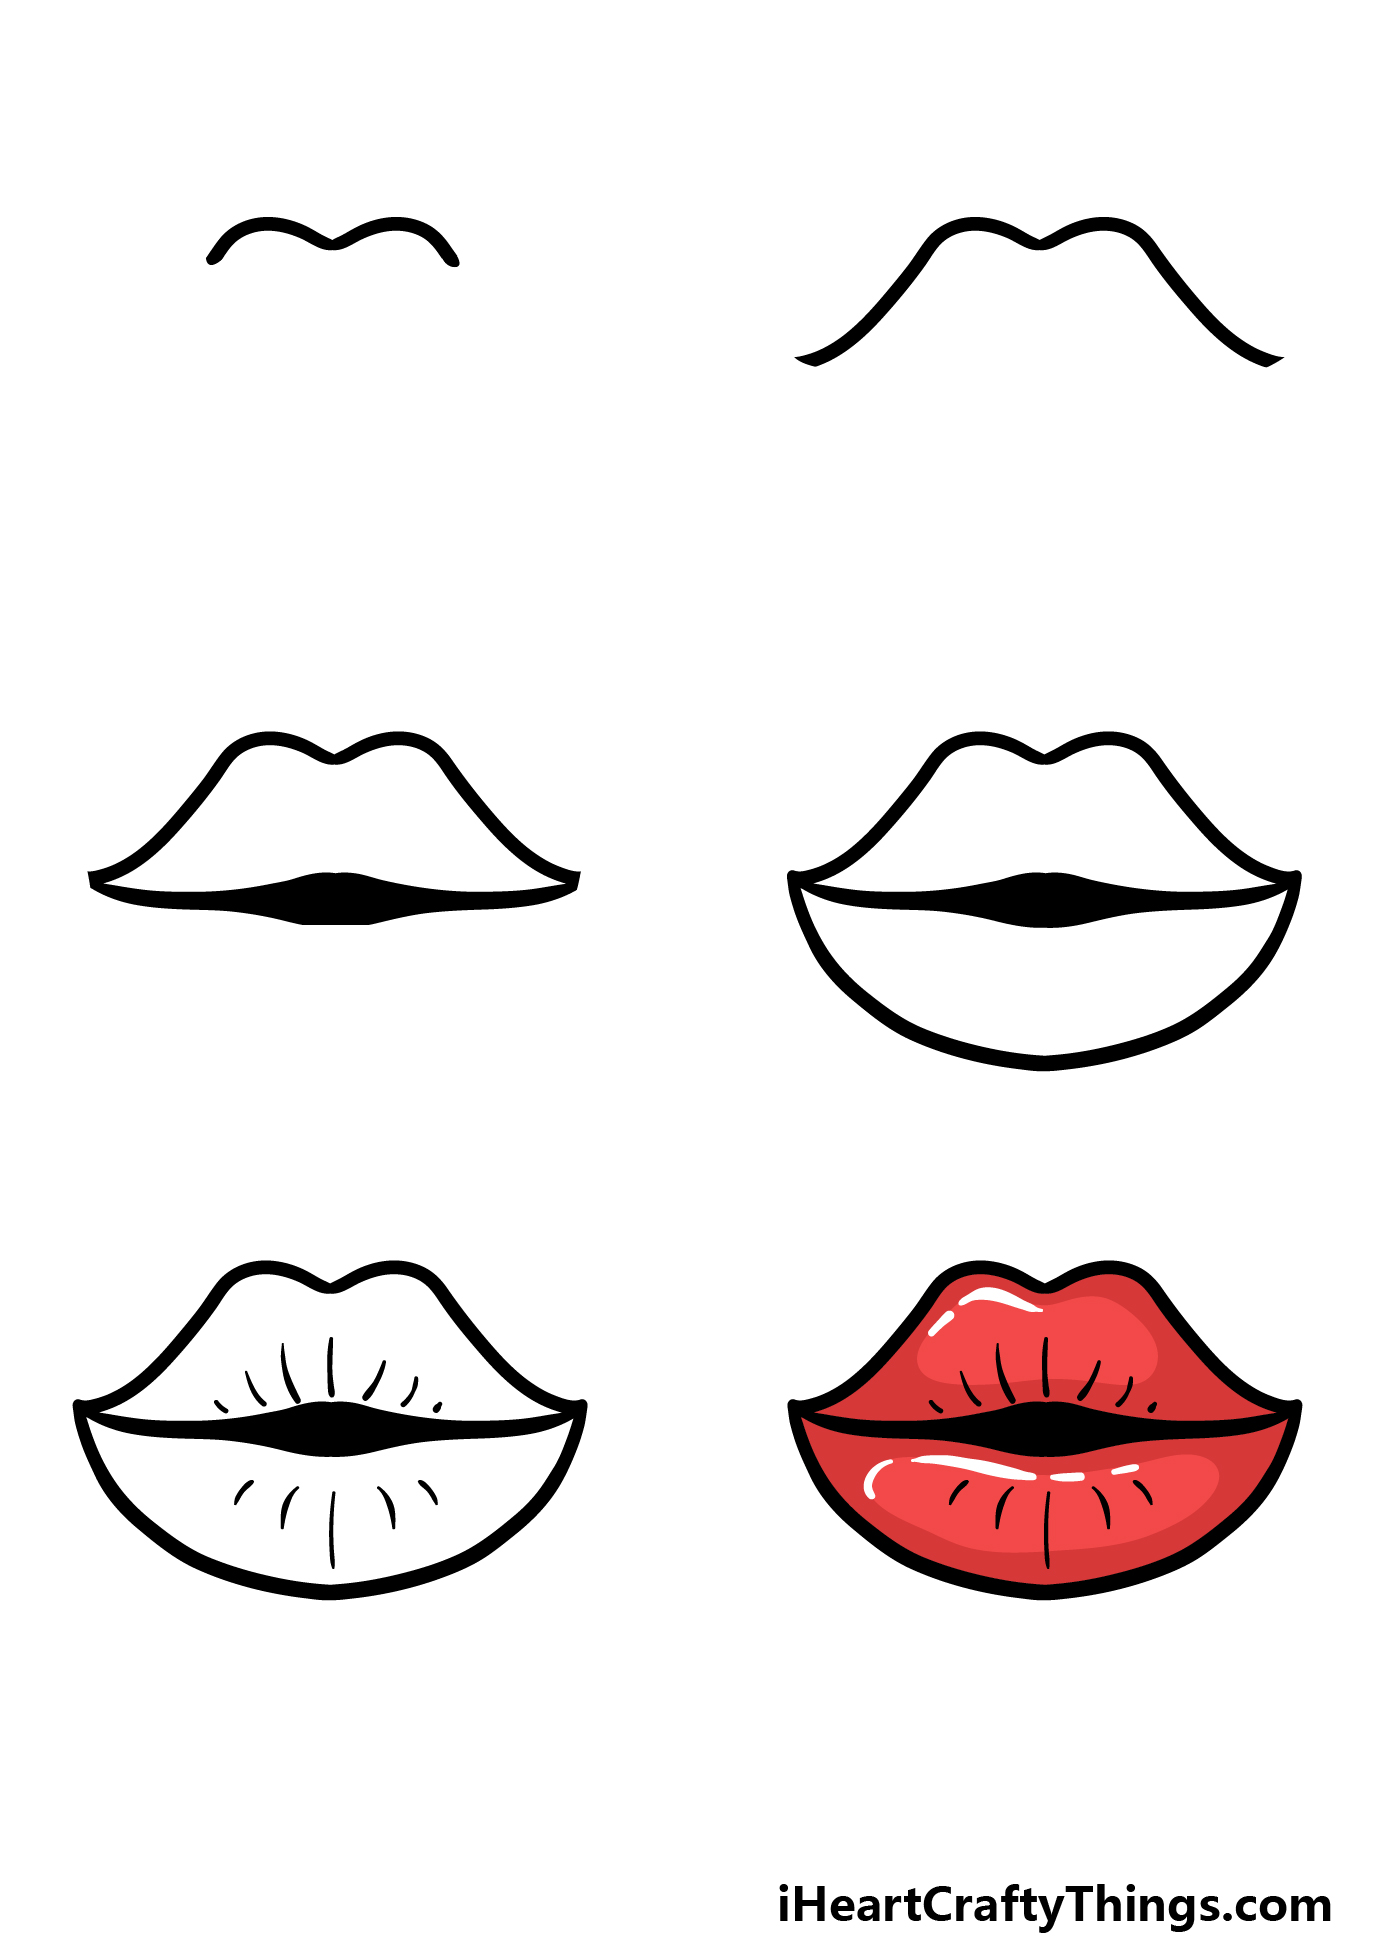
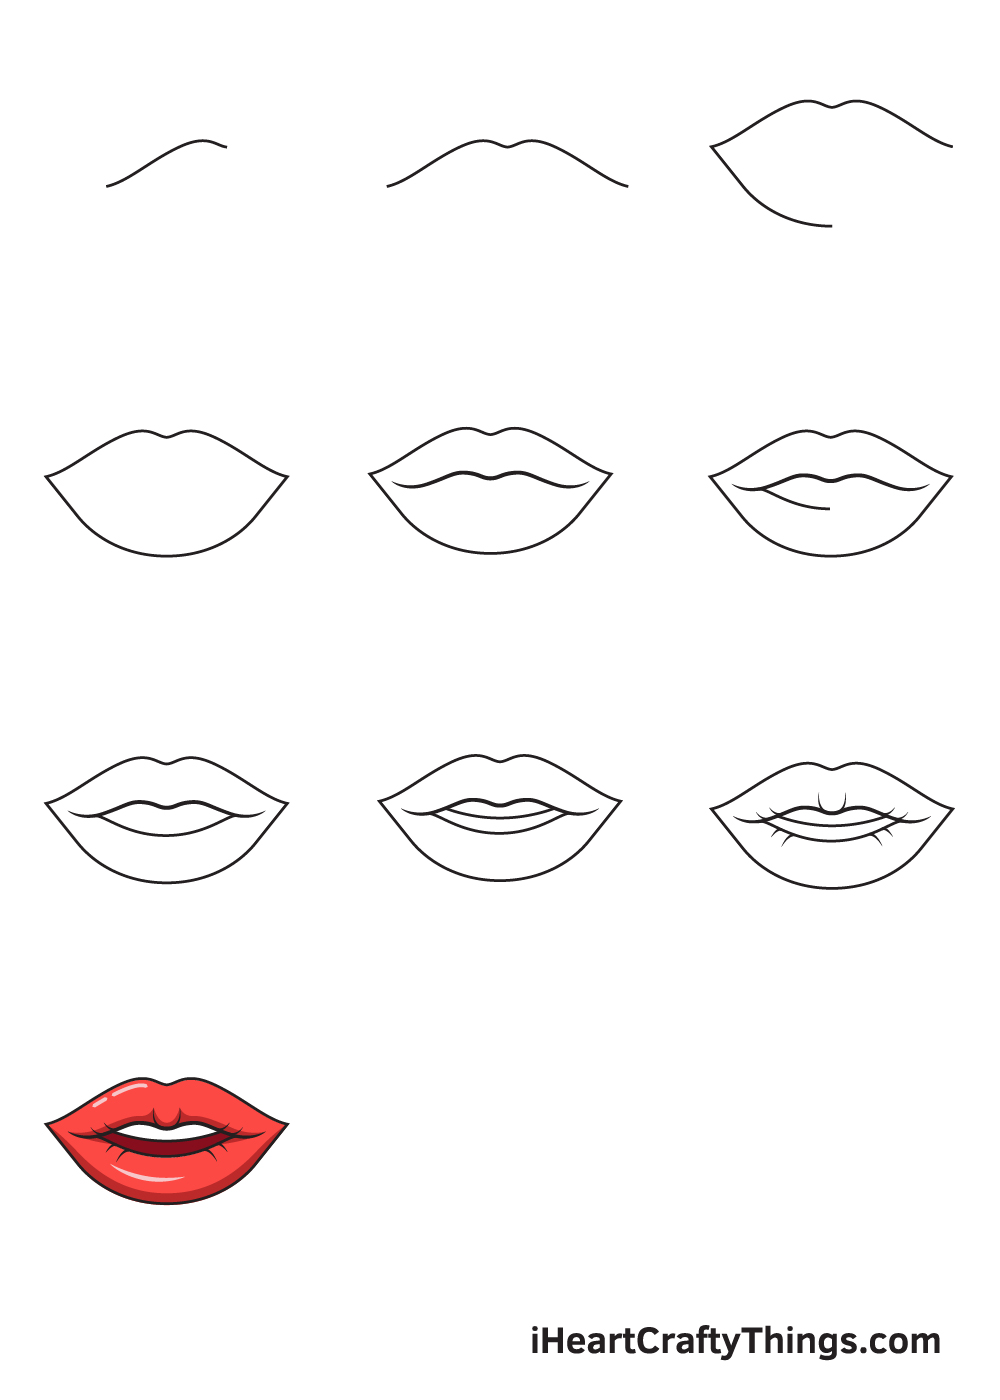
Step-by-Step Guide to Drawing Cartoon Lips
Alright, let’s get down to business. Here’s a step-by-step guide to help you draw cartoon lips like a pro:
Step 1: Sketch the Basic Shape
Begin by lightly sketching the basic shape of the lips. This could be an oval, circle, or even a rectangle, depending on the style you’re going for. Don’t worry about making it perfect—this is just a rough outline to guide you as you go.
Step 2: Define the Upper and Lower Lips
Once you’ve got your basic shape, it’s time to define the upper and lower lips. Remember, the upper lip is usually thinner than the lower lip, but feel free to play around with proportions to create different looks. For example, if you’re drawing a flirty character, you might want to make the lower lip a little fuller.
Step 3: Add Details
Now it’s time to add some details to your lips. This could include lines to indicate the natural curves of the lips, shading to add depth, or even little highlights to make them look shiny. Think about the character you’re drawing and how their lips can reflect their personality. Are they bold and confident? Or maybe they’re shy and reserved?
Step 4: Refine and Clean Up
Once you’ve added all the details, take a step back and look at your drawing. Are there any lines that need to be erased or refined? Make any necessary adjustments and clean up your sketch. If you’re drawing digitally, this is where you can use layers to make the process easier.
Common Mistakes to Avoid When Drawing Cartoon Lips
Even the best artists make mistakes sometimes, and that’s totally okay. The key is to learn from them and keep improving. Here are some common mistakes to avoid when drawing cartoon lips:
- Forgetting to define the upper and lower lips
- Making the lips too symmetrical (real lips are rarely perfectly even)
- Not considering the character’s personality when designing the lips
- Overcomplicating the design with too many details
Remember, cartoon lips are all about simplicity and exaggeration. Don’t be afraid to take risks and try new things. The more you practice, the better you’ll get!
Tools and Materials You’ll Need
Before you start drawing, make sure you have the right tools and materials. Here’s what you’ll need:
- A pencil or pen (graphite pencils are great for sketching)
- An eraser (a kneaded eraser is perfect for removing light lines)
- A blank sheet of paper (or a digital drawing tablet if you prefer)
- Colored pencils, markers, or digital brushes (optional, for adding color)
If you’re just starting out, don’t worry too much about having fancy tools. A simple pencil and paper will do just fine. As you get more comfortable with the process, you can experiment with different materials to find what works best for you.
Adding Personality to Your Cartoon Lips
One of the coolest things about drawing cartoon lips is that you can use them to add personality to your characters. Think about the emotions you want to convey and how the lips can help bring those emotions to life. For example:
- A big, wide smile can show happiness and excitement
- A small, tight-lipped smile can indicate shyness or nervousness
- A frown can express sadness or frustration
- A smirk can show confidence or mischief
Don’t be afraid to experiment with different expressions and see how they affect the overall look of your character. The more you practice, the better you’ll get at capturing those subtle nuances that make your art unique.
Tips for Improving Your Drawing Skills
So, you’ve learned the basics of how to draw cartoon lips. But how can you take your skills to the next level? Here are a few tips to help you improve:
- Practice regularly—set aside time each day to sketch and experiment
- Study other artists’ work to see how they approach cartoon lips
- Experiment with different styles and techniques to find what works for you
- Don’t be afraid to make mistakes—every mistake is a learning opportunity
Remember, becoming a great artist takes time and practice. The more you draw, the more confident you’ll become in your abilities. And who knows? Maybe one day you’ll be the one inspiring others with your incredible cartoon lips!
Real-Life Examples of Cartoon Lips in Action
Let’s take a look at some real-life examples of cartoon lips in action. From classic Disney characters to modern anime styles, there’s a ton of inspiration out there for you to explore. Here are a few examples:
- Mickey Mouse’s iconic round lips
- Bender from "Futurama" with his exaggerated, mechanical lips
- SpongeBob SquarePants with his quirky, smiley lips
- Anime characters with their delicate, minimalist lips
These examples show just how versatile cartoon lips can be. Whether you’re going for a classic look or something more modern, there’s no shortage of inspiration out there. So, don’t be afraid to draw inspiration from your favorite cartoons and make it your own!
Conclusion: Keep Practicing and Have Fun!
Well, there you have it—everything you need to know about how to draw cartoon lips. From understanding the basic anatomy to adding personality and emotion, you’ve got all the tools you need to start creating amazing cartoon lips. Remember, the key is to keep practicing and having fun with the process.
So, what are you waiting for? Grab your pencil and start drawing those lips! And don’t forget to share your creations with the world. Who knows? You might just inspire someone else to pick up a pencil and start drawing too. Happy sketching, my friend!
Table of Contents
- Why Learning How to Draw Cartoon Lips Is Important
- Basic Anatomy of Cartoon Lips
- Step-by-Step Guide to Drawing Cartoon Lips
- Common Mistakes to Avoid When Drawing Cartoon Lips
- Tools and Materials You’ll Need
- Adding Personality to Your Cartoon Lips
- Tips for Improving Your Drawing Skills
- Real-Life Examples of Cartoon Lips in Action
- Conclusion: Keep Practicing and Have Fun!