So listen up, my friend. Applying a Band-Aid might seem super easy, but trust me, there's more to it than meets the eye. You've probably been doing it wrong your whole life, and no one ever told you about it. But don’t worry, because today, we’re diving deep into the world of first aid basics with a focus on how to put a Band-Aid on your finger like a pro. This ain’t just about slapping a strip of adhesive on your skin; it’s about getting it done right so your finger heals faster and stays protected. And yeah, we’re talking about something as simple as a Band-Aid, but trust me, it’s important!
Now, before you roll your eyes thinking, "Dude, I’ve got this!" let me tell you that there’s actually a science behind wound care. If you don’t take the right steps, you could risk infection, slow healing, or even further injury. So, whether you’re a parent trying to patch up a kid’s boo-boo or just someone who keeps bumping their fingers on sharp objects, this guide is for you. We’ll cover everything from cleaning the wound to picking the right Band-Aid for the job.
And hey, if you’re wondering why I’m making such a big deal out of a Band-Aid, it’s because small cuts and scrapes can turn into big problems if not handled correctly. Let’s face it, life’s messy, and fingers are the most used part of our body. So, let’s make sure we’re taking care of them properly. Stick around, and by the end of this article, you’ll be a certified Band-Aid expert!
Read also:Courtney Hope Dating Whos The Lucky Guy In Her Life
Why Proper Band-Aid Application Matters
Alright, let’s get real here. You might think that a Band-Aid is just a piece of fabric with sticky stuff on it, but it’s actually a crucial tool in wound care. When you apply a Band-Aid correctly, you’re not just covering up the injury; you’re creating a protective barrier that helps keep bacteria out and moisture in. This combo is essential for faster healing and reducing the risk of infection. Plus, a properly placed Band-Aid can prevent further irritation and discomfort.
Now, here’s the deal. If you slap a Band-Aid on without cleaning the wound first, you’re just trapping dirt and germs under the adhesive. That’s like inviting trouble to your finger party. And if the Band-Aid isn’t applied snugly, it can fall off, leaving your wound exposed. So, yeah, it’s not just about sticking something on your finger—it’s about doing it the right way.
Common Mistakes People Make When Applying a Band-Aid
Let’s talk about some of the most common mistakes people make when applying a Band-Aid. First off, skipping the cleaning step is a big no-no. I get it, you’re in a rush, but trust me, taking a minute to clean the wound can make all the difference. Another mistake is using the wrong size Band-Aid. If it’s too small, it won’t cover the entire wound. And if it’s too big, it might not stick properly. Lastly, people often forget to check for allergies. Some folks are sensitive to certain adhesives, and using the wrong Band-Aid can lead to irritation.
Step-by-Step Guide to Applying a Band-Aid
Now that we’ve covered why it’s important and what not to do, let’s dive into the step-by-step process. Follow these steps, and you’ll be a Band-Aid guru in no time.
Step 1: Wash Your Hands
This is a no-brainer, but I’m gonna say it anyway. Before you touch the wound or the Band-Aid, wash your hands thoroughly with soap and water. You don’t want to introduce any germs to the area. Think of your hands as the gateway to infection, so clean ‘em up!
Step 2: Clean the Wound
Next up, it’s time to clean the wound. Gently rinse it with lukewarm water to remove any dirt or debris. If there’s any stubborn dirt, use a soft cloth or cotton swab to gently wipe it away. Avoid using hydrogen peroxide or alcohol, as they can irritate the wound. Instead, opt for a mild antiseptic solution if needed.
Read also:Robert Benevides And Raymond Burr A Journey Through Time
Step 3: Dry the Area
Once the wound is clean, pat it dry with a clean towel or tissue. Make sure the area is completely dry before applying the Band-Aid. Moisture can reduce the adhesive’s effectiveness, so drying is key.
Step 4: Choose the Right Band-Aid
Not all Band-Aids are created equal. Depending on the size and location of the wound, you might need a different type. For fingers, standard adhesive Band-Aids usually work well, but if the wound is on a joint or a moving part, consider using a flexible or waterproof option.
Step 5: Apply the Band-Aid
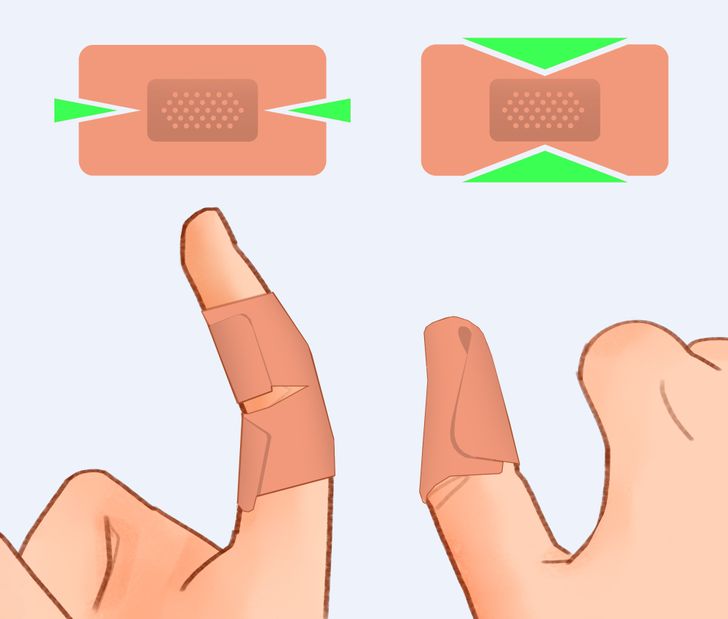
Now comes the moment of truth. Peel the backing off the Band-Aid, being careful not to touch the adhesive part. Place the pad directly over the wound and press down gently to secure it. Make sure the edges are snug against the skin, but not too tight that it cuts off circulation.
Tips for Effective Band-Aid Application
Here are a few extra tips to make sure your Band-Aid application game is on point:
- Always check the expiration date on the Band-Aid package. Expired adhesives might not stick as well.
- For larger wounds, consider using gauze and medical tape instead of a standard Band-Aid.
- If the wound is on a part of the body that gets a lot of movement, apply a second Band-Aid over the first for extra protection.
- Change the Band-Aid daily or whenever it gets wet or dirty. This ensures the wound stays clean and protected.
Understanding Different Types of Band-Aids
Not all Band-Aids are created equal, my friend. There are different types designed for specific needs. Here’s a quick rundown:
Standard Adhesive Band-Aids
These are your go-to Band-Aids for minor cuts and scrapes. They’re easy to use and come in various sizes. Perfect for everyday first aid needs.
Flexible Band-Aids
If the wound is on a joint or a moving part, flexible Band-Aids are the way to go. They stretch and move with your body, providing comfort and protection.
Waterproof Band-Aids
For those times when you need to keep your wound dry, waterproof Band-Aids are a lifesaver. They’re great for swimming, showering, or any activity that involves water.
Antiseptic Band-Aids
Some Band-Aids come with a built-in antiseptic pad, which helps prevent infection. These are perfect for wounds that are prone to bacteria.
When to Seek Medical Attention
While Band-Aids are great for minor injuries, there are times when you need to seek professional help. If the wound is deep, won’t stop bleeding, or shows signs of infection (redness, swelling, pus), it’s time to visit a doctor. Remember, your health is important, and it’s always better to err on the side of caution.
How to Store Band-Aids Properly
Proper storage can extend the life of your Band-Aids. Keep them in a cool, dry place away from direct sunlight. Avoid exposing them to extreme temperatures, as this can affect the adhesive. And don’t forget to check the expiration date regularly.
Conclusion
So there you have it, folks. Applying a Band-Aid might seem simple, but there’s definitely a method to the madness. By following these steps and tips, you can ensure that your finger stays protected and heals properly. Remember, it’s not just about covering up the wound; it’s about creating the right environment for healing. And hey, if you ever find yourself in doubt, don’t hesitate to seek professional help.
Now, here’s where you come in. Did you find this guide helpful? Have you ever had a Band-Aid disaster story to share? Drop a comment below, and let’s keep the conversation going. And while you’re at it, why not share this article with your friends? Trust me, they’ll thank you for it!
Table of Contents
- Why Proper Band-Aid Application Matters
- Common Mistakes People Make When Applying a Band-Aid
- Step-by-Step Guide to Applying a Band-Aid
- Tips for Effective Band-Aid Application
- Understanding Different Types of Band-Aids
- When to Seek Medical Attention
- How to Store Band-Aids Properly
- Conclusion