Are you tired of seeing the same old shirt styles in your closet? Well, here's a fun and creative way to spice things up! Learning how to cut a shirt to tie in front is like giving your wardrobe a total makeover without spending a dime. This simple yet stylish hack lets you transform a plain shirt into a trendy piece that screams personality. Trust me, it's easier than you think, and the results? Absolutely worth it!
Let's face it, fashion trends come and go, but sometimes the best looks are the ones you create yourself. Cutting a shirt to tie in front adds an edge to your style, making you stand out from the crowd. And hey, who doesn't love feeling like a fashion designer for a day? With just a pair of scissors and a little creativity, you can turn something ordinary into extraordinary.
Now, if you're wondering why this trend is blowing up, it's all about versatility and confidence. Whether you're heading to a casual hangout or a beach day, this DIY shirt hack is perfect for any occasion. Plus, it's a great way to recycle those old shirts you've been meaning to toss. So, let's dive in and learn how to cut a shirt to tie in front like a pro!
Read also:Did Russell Brand Date Amy Winehouse Unveiling The Truth Behind The Rumors
Why Cutting a Shirt to Tie in Front is a Game-Changer
Adding a Personal Touch to Your Wardrobe
There's something magical about personalizing your clothes. When you learn how to cut a shirt to tie in front, you're not just altering a piece of fabric; you're creating art. This trend allows you to express yourself in ways that ready-to-wear clothes simply can't. It's like putting your signature on every outfit you wear.
Imagine walking into a room and everyone complimenting your unique style. That's the power of DIY fashion. You'll feel more connected to your clothes because you've put effort and creativity into them. And let's be honest, nothing beats the satisfaction of wearing something you made yourself.
Boosting Your Confidence with DIY Fashion
Confidence is key, and there's no better way to boost yours than by rocking a custom-made outfit. Cutting a shirt to tie in front gives you that extra swagger you didn't know you needed. It shows that you're not afraid to take risks and experiment with your style. People will notice, and they'll love it!
Plus, when you know you look good, you feel good. This simple DIY project can have a huge impact on your self-esteem. You'll walk taller, smile wider, and own every room you enter. So, why not give it a shot? Your future self will thank you.
Choosing the Perfect Shirt for Your DIY Project
What to Look For in a Shirt
Not all shirts are created equal when it comes to DIY projects. You'll want to choose a shirt that's made from breathable, stretchy material like cotton or rayon. These fabrics are easier to work with and will hold up better when tied. Also, consider the color and pattern. A solid color or a subtle print will make the tie detail stand out more.
Think about the occasions where you'll wear this shirt. If it's for a beach day, go for lighter colors that won't absorb too much heat. For a night out, darker shades with a pop of color can be a great choice. Remember, the shirt you choose sets the tone for the entire look, so pick wisely.
Read also:Basil Anderson And Lisa Arrindell The Journey Of Love Passion And Influence
Recycling Old Shirts: Sustainability at Its Best
One of the coolest things about this trend is that it promotes sustainability. Instead of throwing away old shirts, you can give them a new life by cutting and tying them. This not only helps the environment but also saves you money. Plus, who doesn't love a good upcycling story?
According to a report by the Environmental Protection Agency, Americans generate around 17 million tons of textile waste each year. By repurposing your old clothes, you're doing your part to reduce that number. So, not only will you look fabulous, but you'll also feel good about your eco-friendly choices.
Step-by-Step Guide: How to Cut a Shirt to Tie in Front
Gathering Your Materials
Before you start cutting, make sure you have everything you need. Here's a quick checklist:
- A plain shirt (preferably one you're okay with altering)
- A pair of sharp scissors
- A fabric marker or chalk (optional, for marking)
- A ruler or measuring tape (optional, for precision)
Having the right tools makes the process smoother and ensures a cleaner cut. Plus, sharp scissors are crucial to avoid fraying or uneven edges.
Marking the Cutting Lines
Now, let's get down to business. Lay your shirt flat on a clean surface and decide how long you want the ties to be. A good rule of thumb is to leave about 6-8 inches of fabric below the bottom edge of the tie. Use your fabric marker or chalk to draw a straight line across the shirt where you want to cut. If you're feeling adventurous, you can add some curves or angles for a more unique look.
Don't worry if your lines aren't perfect. This is a DIY project, and imperfections can add character to your creation. Just make sure both sides are roughly equal so the tie looks balanced.
Cutting the Shirt
Time to put those scissors to work! Carefully cut along the lines you've drawn, making sure to cut through both layers of fabric. If you're worried about fraying, you can use a zigzag stitch on a sewing machine or apply fabric glue along the edges. Once you've made the cut, try on the shirt to see how it fits. You can always adjust the length of the ties if needed.
Remember, this is all about creativity, so don't be afraid to experiment. Try cutting at different angles or adding embellishments like beads or patches. The possibilities are endless!
Tips and Tricks for a Flawless Finish
Getting the Tie Just Right
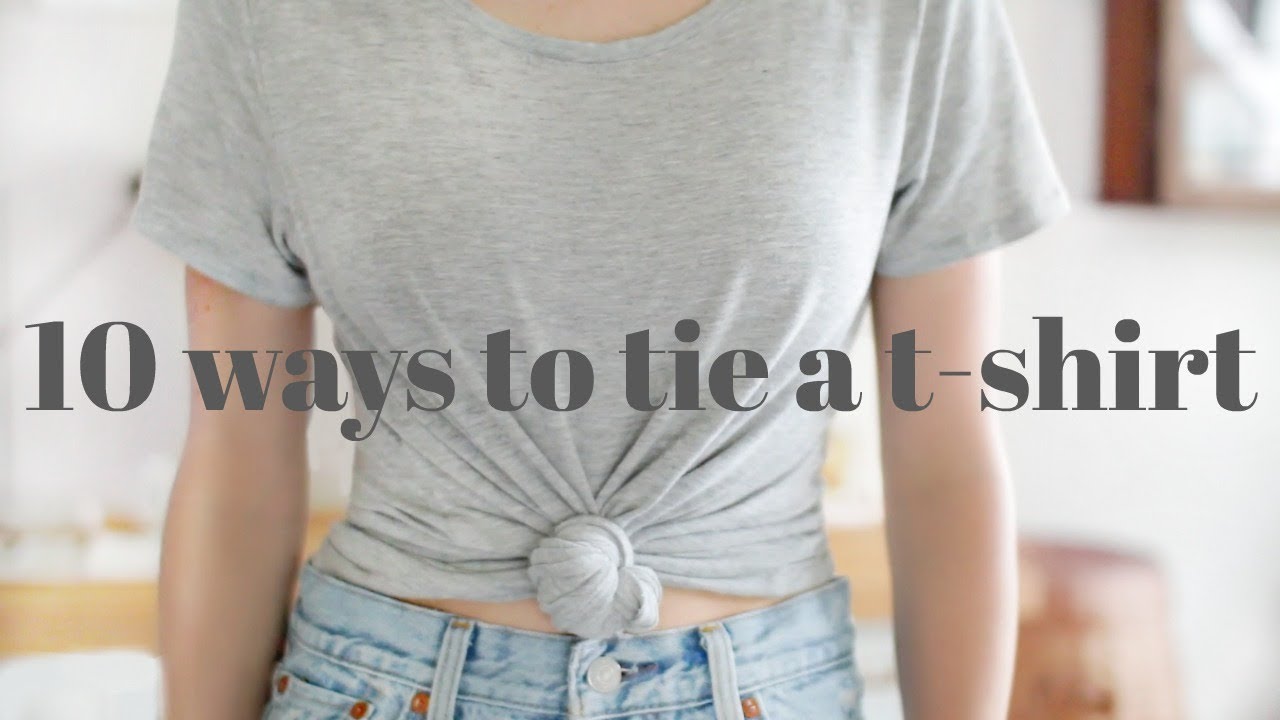
Once your shirt is cut, it's time to tie it up. Start by overlapping the two sides and tying a simple knot. If the ties are too long, you can double knot them or even tie them into a bow for a playful look. The key is to play around until you find a style that works for you.
For a more polished look, consider using a belt or chain to enhance the tie. This adds an extra layer of detail and can take your outfit to the next level. Remember, fashion is all about experimentation, so don't be afraid to mix and match.
Avoiding Common Mistakes
While this project is pretty straightforward, there are a few pitfalls to watch out for. One common mistake is cutting too much fabric, which can make the shirt too short or expose too much skin. To avoid this, start with a smaller cut and gradually increase the length until you're happy with the result.
Another thing to keep in mind is fabric fraying. If you notice the edges starting to unravel, try using a fabric sealant or even a clear nail polish to prevent further damage. These small details can make a big difference in the overall look of your shirt.
Styling Your New DIY Shirt
Pairing with Bottoms
Now that you've got your new shirt, it's time to think about what to wear with it. For a casual look, pair it with high-waisted jeans or shorts. This creates a balanced silhouette and emphasizes the tie detail. If you're going for a more edgy vibe, try pairing it with leather pants or a mini skirt. The contrast will make your shirt stand out even more.
Don't forget about accessories! Adding a statement necklace or a wide-brimmed hat can elevate your entire outfit. The goal is to create a cohesive look that showcases your unique style.
Accessories That Complement Your Look
Accessories are the cherry on top of any outfit. When styling your DIY shirt, consider adding some layered necklaces or chunky bracelets. These pieces can add depth and dimension to your look. If you're feeling bold, try a bold lip color or eyeshadow to match the vibe of your shirt.
And let's not forget about footwear. For a laid-back vibe, slip-on sneakers or sandals are perfect. If you're going out, opt for strappy heels or boots to add some height and drama. The key is to have fun and express yourself through your choices.
DIY Shirt Cutting: A Trend That's Here to Stay
Why This Trend is Taking Over
There's no denying that cutting a shirt to tie in front is more than just a passing trend. It's a movement that celebrates individuality and creativity. In a world where fast fashion dominates, this DIY approach offers a refreshing alternative. It allows people to take control of their style and make it their own.
Plus, with the growing focus on sustainability, this trend aligns perfectly with eco-conscious values. By repurposing old clothes, we're reducing waste and promoting a more responsible approach to fashion. It's a win-win for everyone involved.
Inspiring Others to Get Creative
One of the best things about this trend is its ability to inspire others. When people see your custom-made shirt, they might be encouraged to try it themselves. This creates a ripple effect of creativity and innovation in the fashion world. Who knows? Maybe you'll start the next big trend!
So, don't be shy about showing off your DIY masterpiece. Share it on social media, tag your friends, and spread the love. The more people get involved, the more exciting this trend becomes.
Conclusion: Take Action and Transform Your Style
In conclusion, learning how to cut a shirt to tie in front is more than just a DIY project; it's a lifestyle choice. It empowers you to express your creativity, boost your confidence, and make a positive impact on the environment. Plus, it's a ton of fun!
Now that you've got all the tools and tips you need, it's time to take action. Grab that old shirt, get your scissors ready, and let your imagination run wild. Don't forget to share your results with us in the comments below or on social media. We'd love to see what you create!
And hey, if you enjoyed this guide, make sure to check out our other articles for more fashion inspiration and DIY ideas. Your style journey is just beginning, and we're here to support you every step of the way. So, what are you waiting for? Let's get cutting!
Table of Contents
- Why Cutting a Shirt to Tie in Front is a Game-Changer
- Adding a Personal Touch to Your Wardrobe
- Boosting Your Confidence with DIY Fashion
- Choosing the Perfect Shirt for Your DIY Project
- Recycling Old Shirts: Sustainability at Its Best
- Step-by-Step Guide: How to Cut a Shirt to Tie in Front
- Gathering Your Materials
- Marking the Cutting Lines
- Cutting the Shirt
- Tips and Tricks for a Flawless Finish
- Getting the Tie Just Right
- Avoiding Common Mistakes
- Styling Your New DIY Shirt
- Pairing with Bottoms
- Accessories That Complement Your Look
- DIY Shirt Cutting: A Trend That's Here to Stay
- Inspiring Others to Get Creative
- Conclusion: Take Action and Transform Your Style